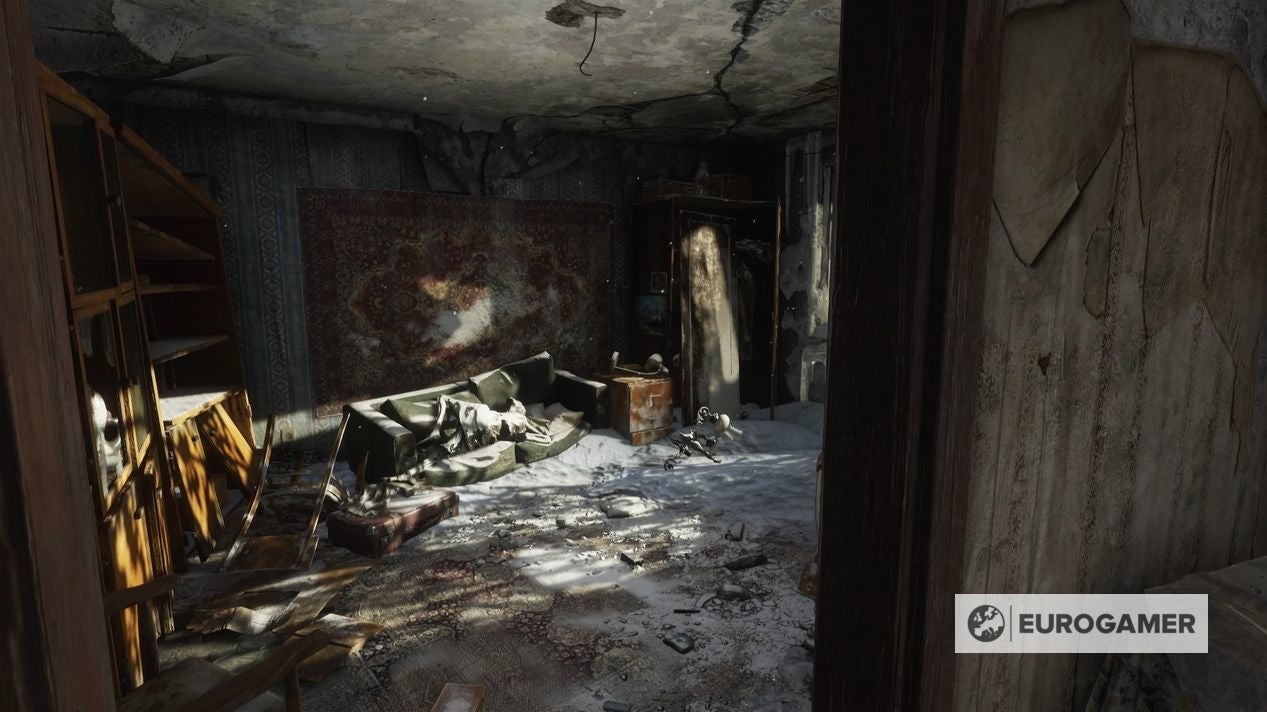
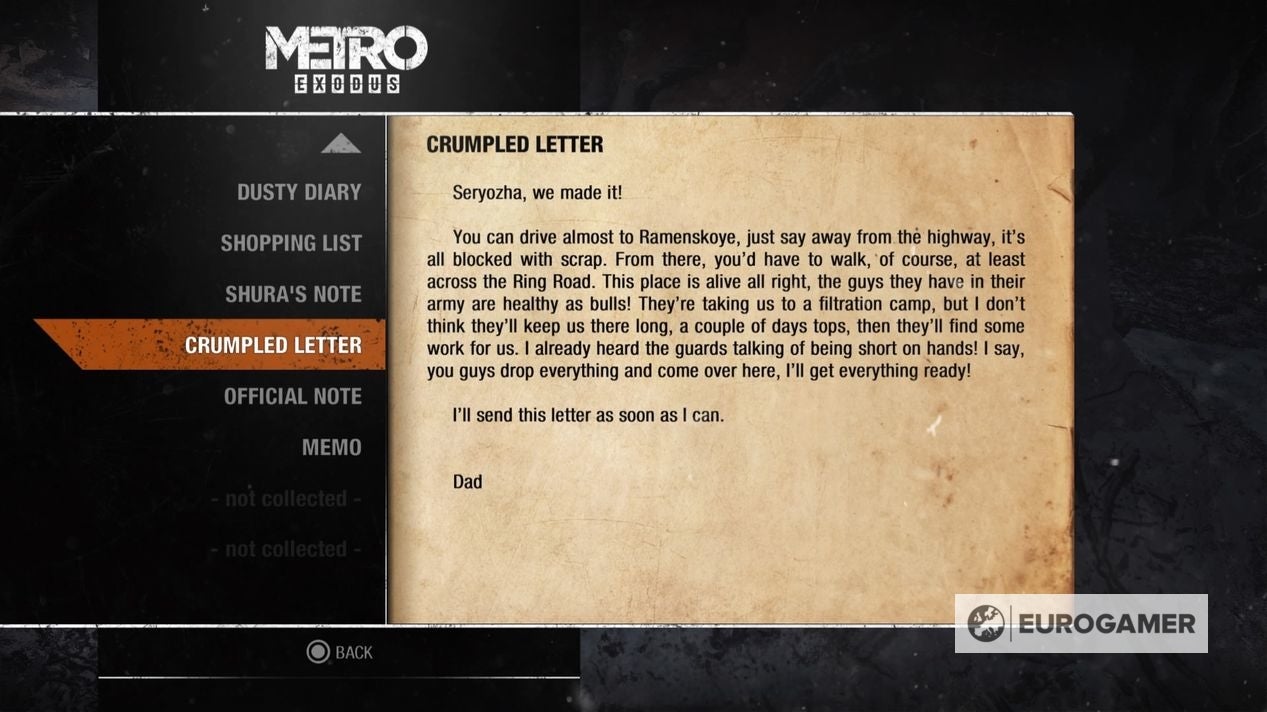
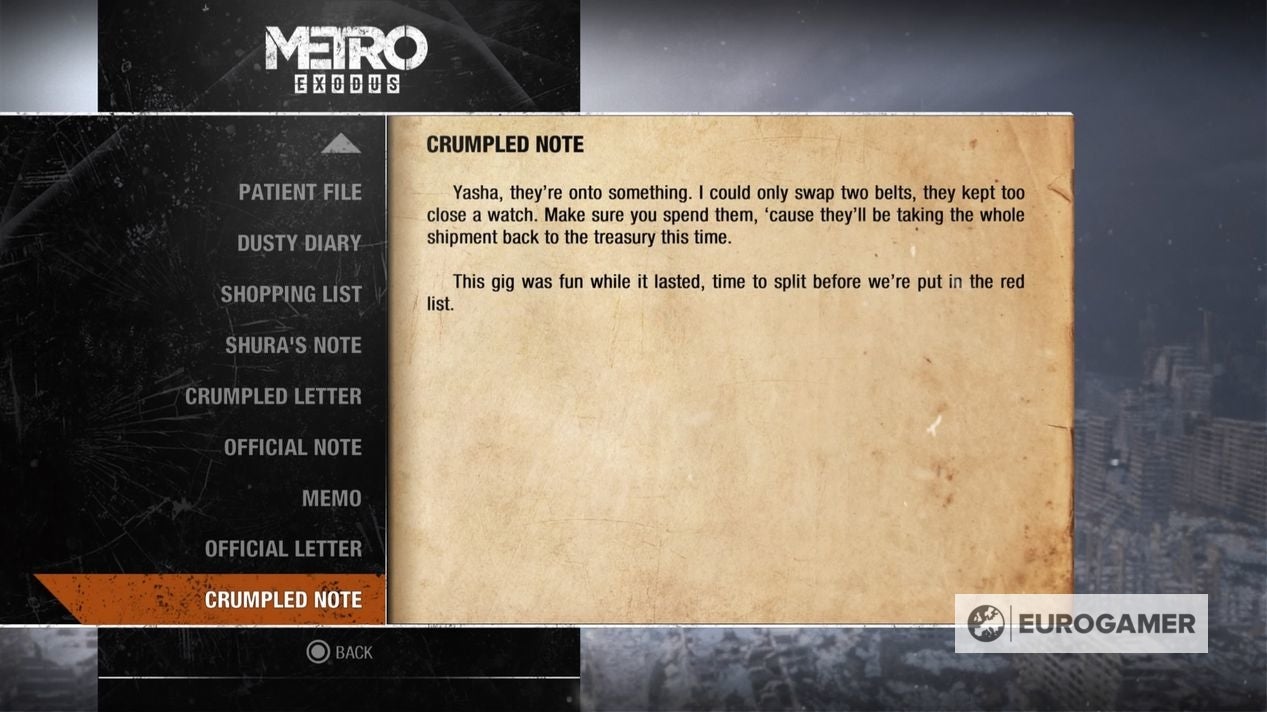
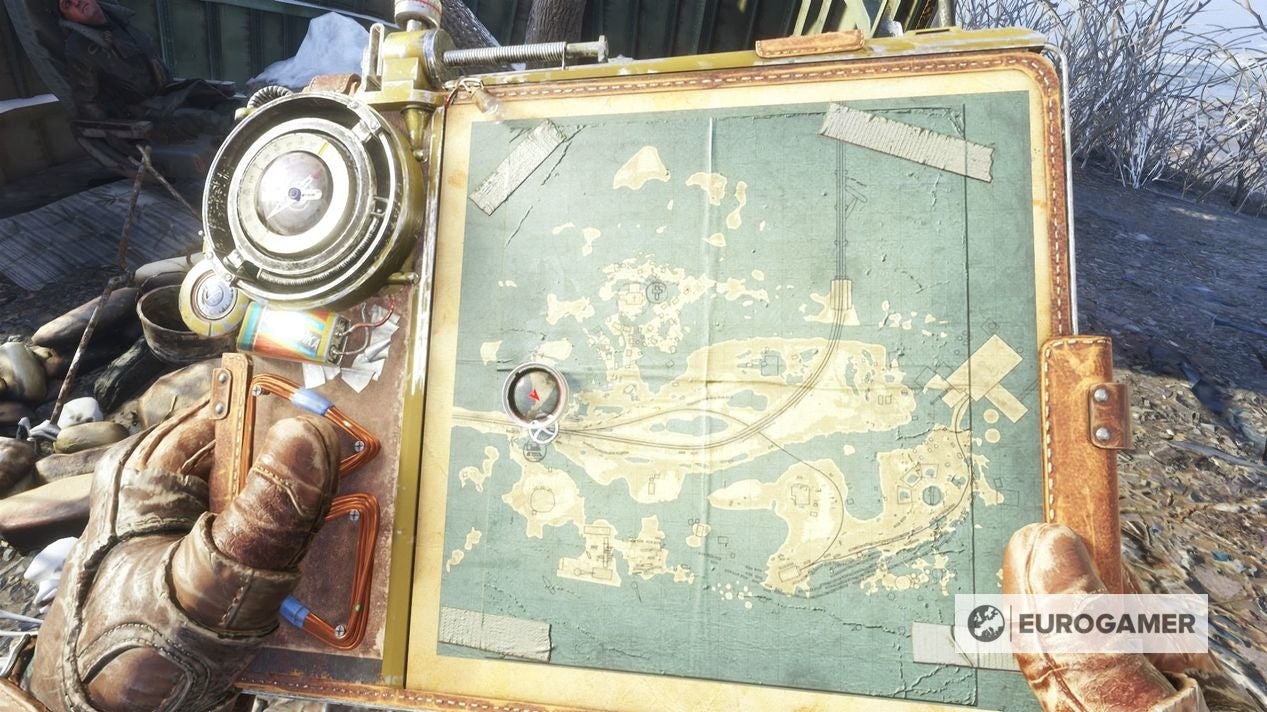
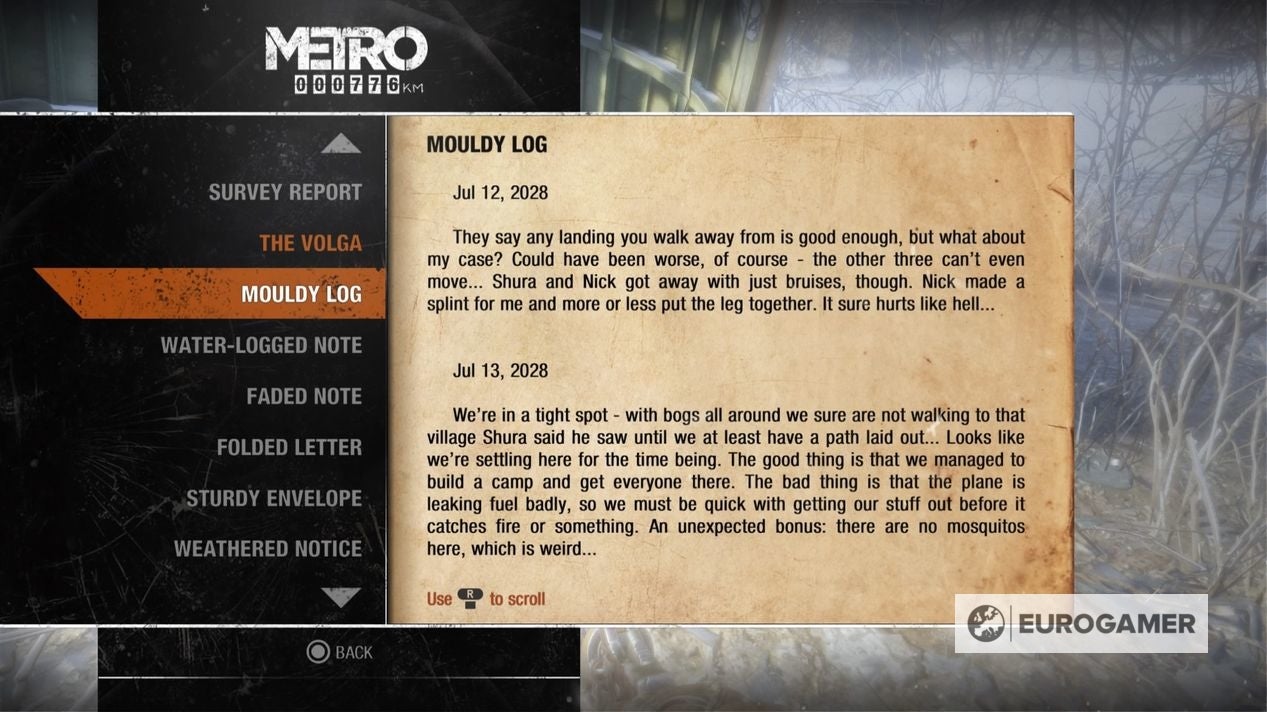
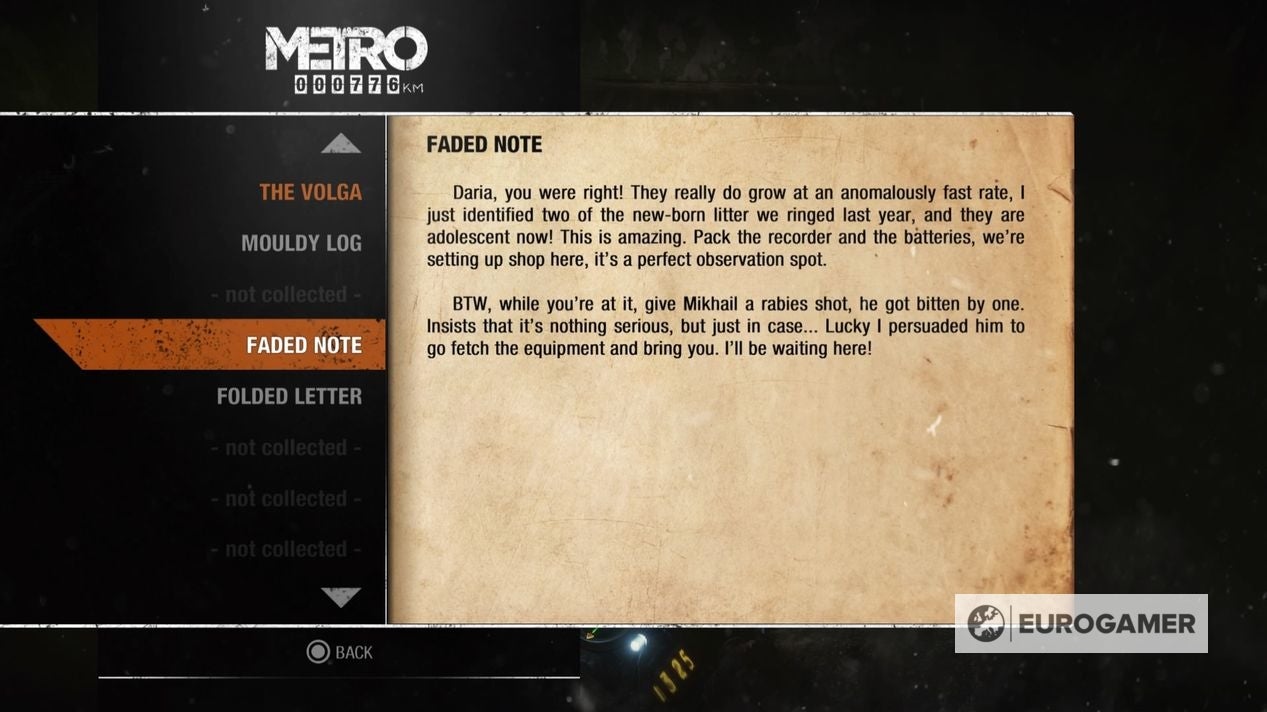
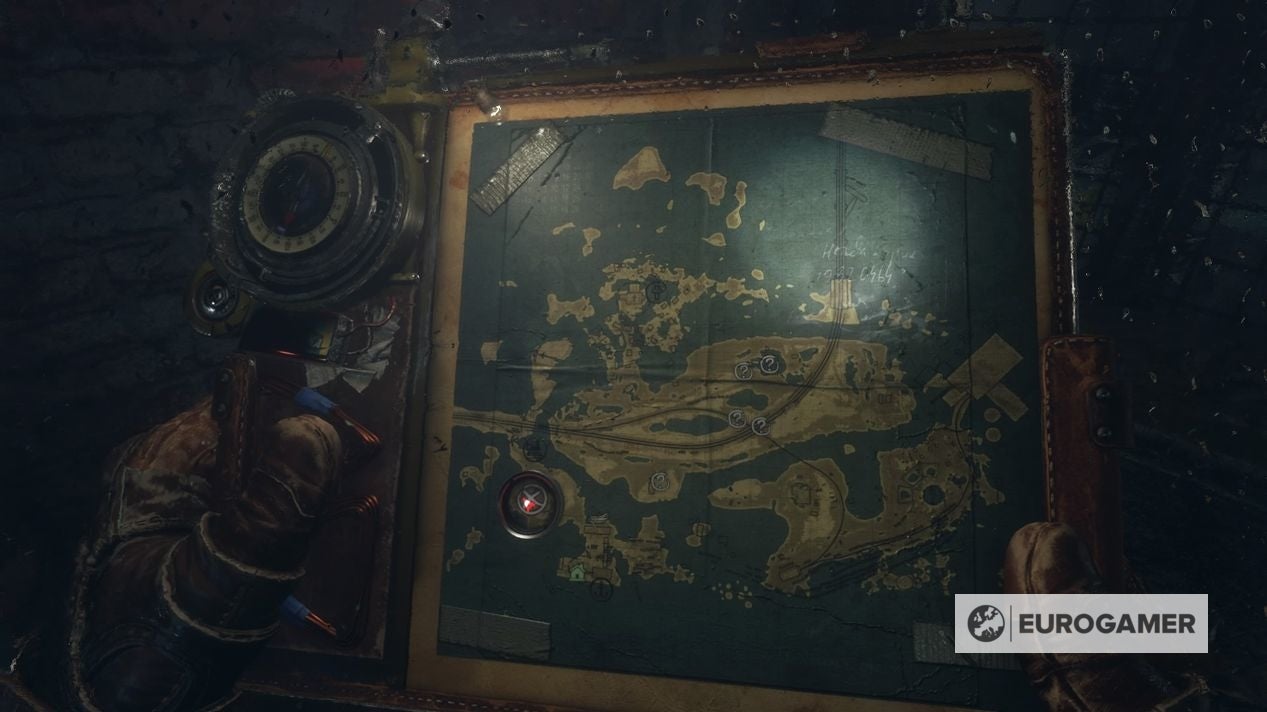
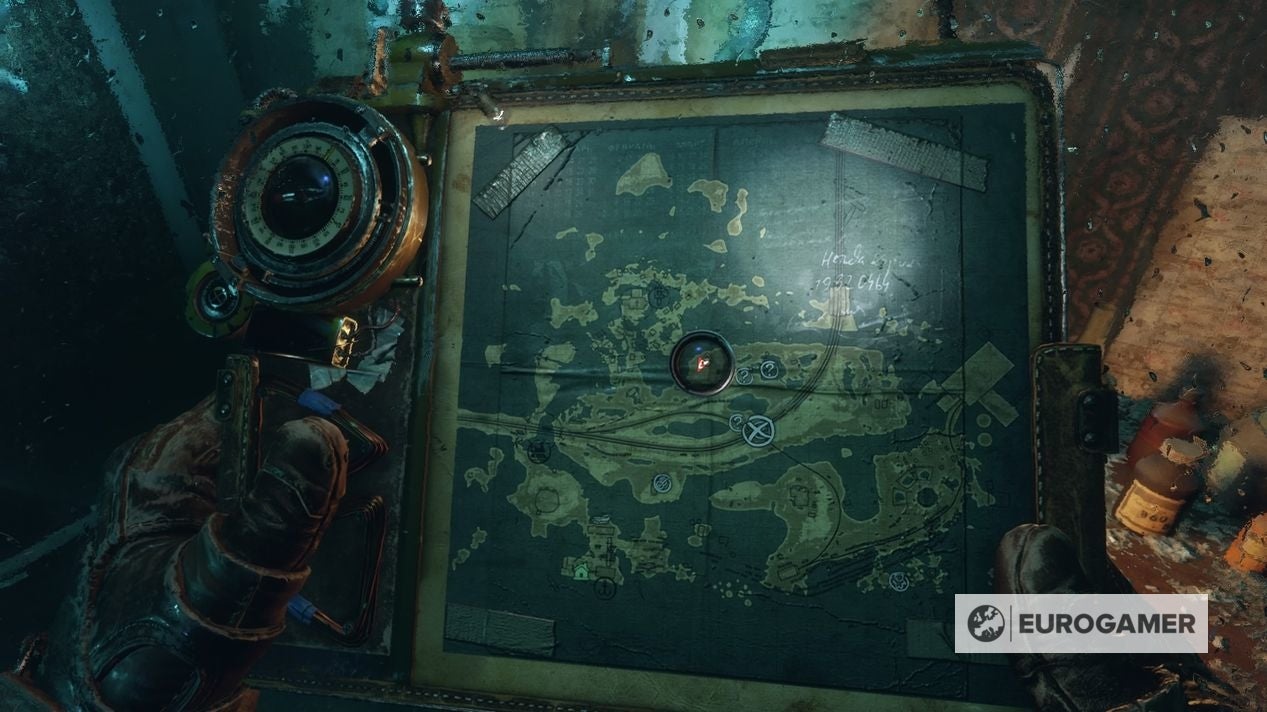
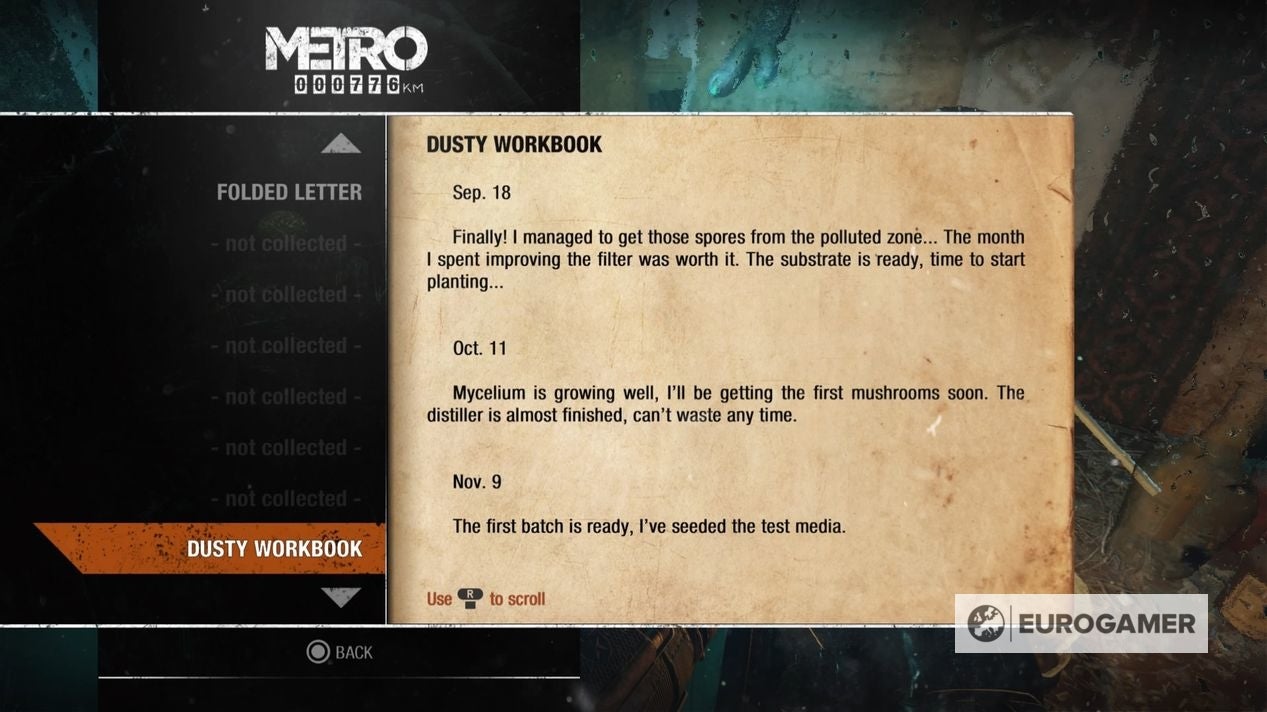
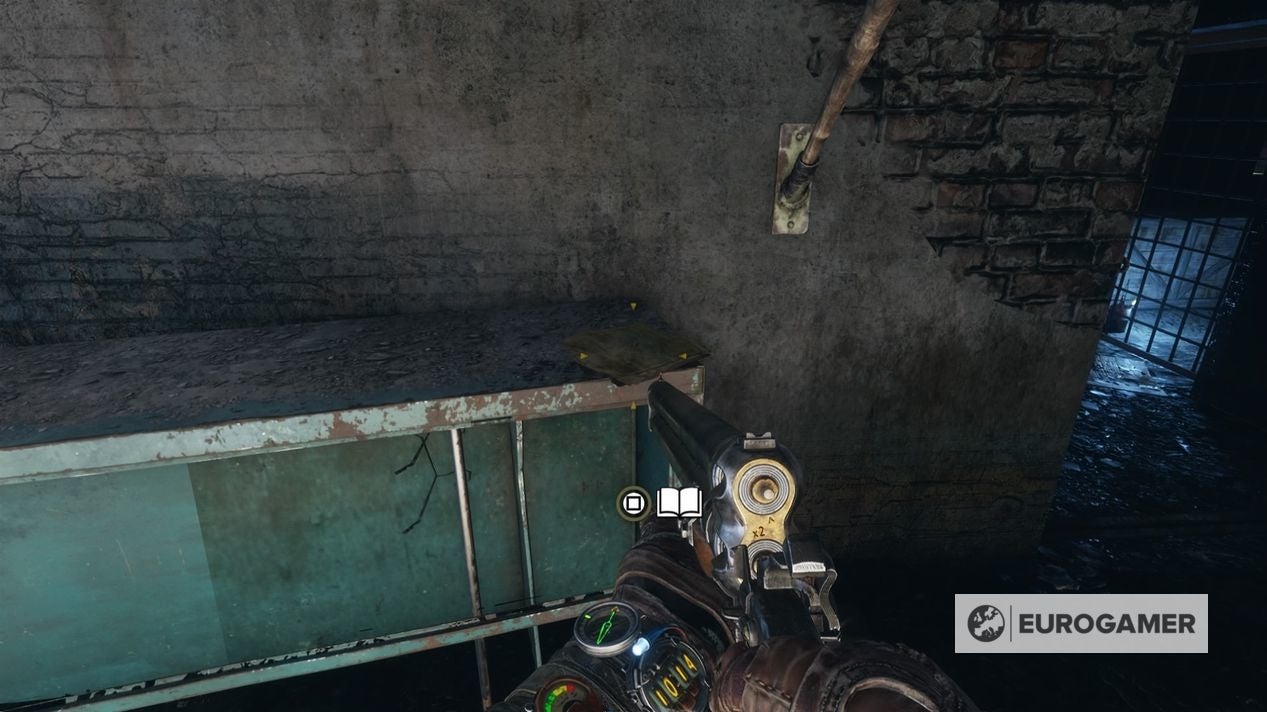
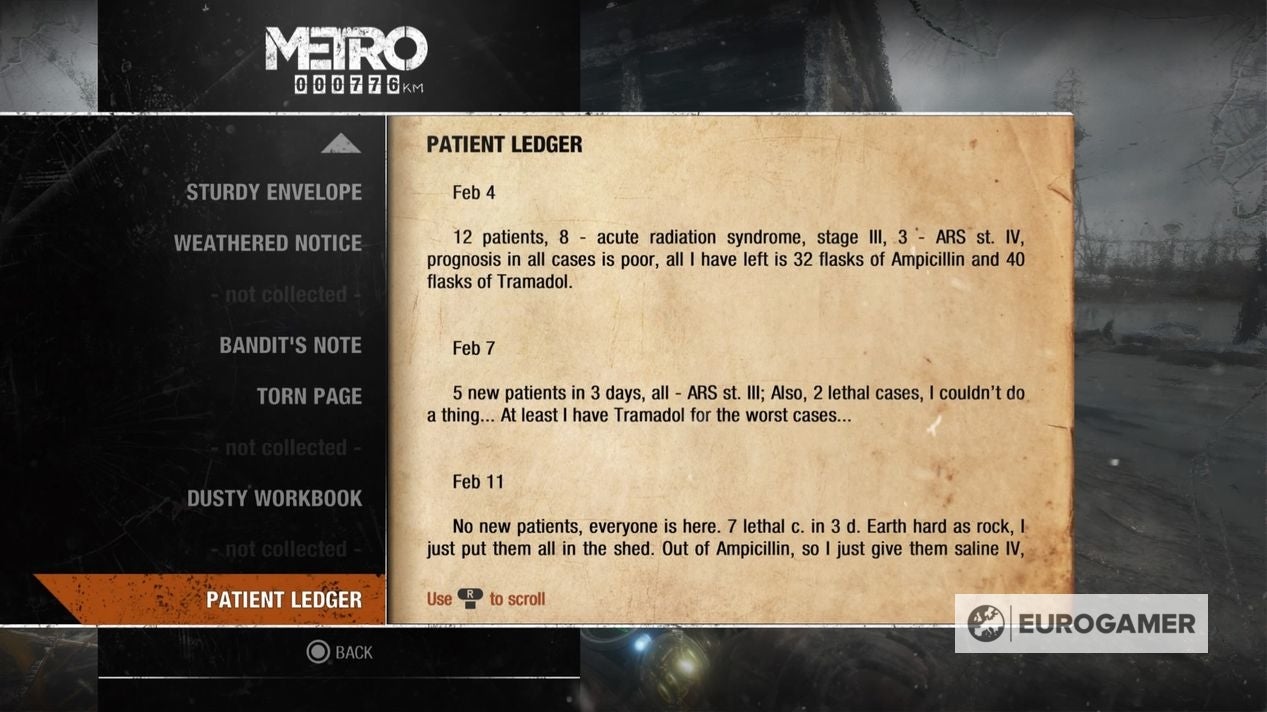
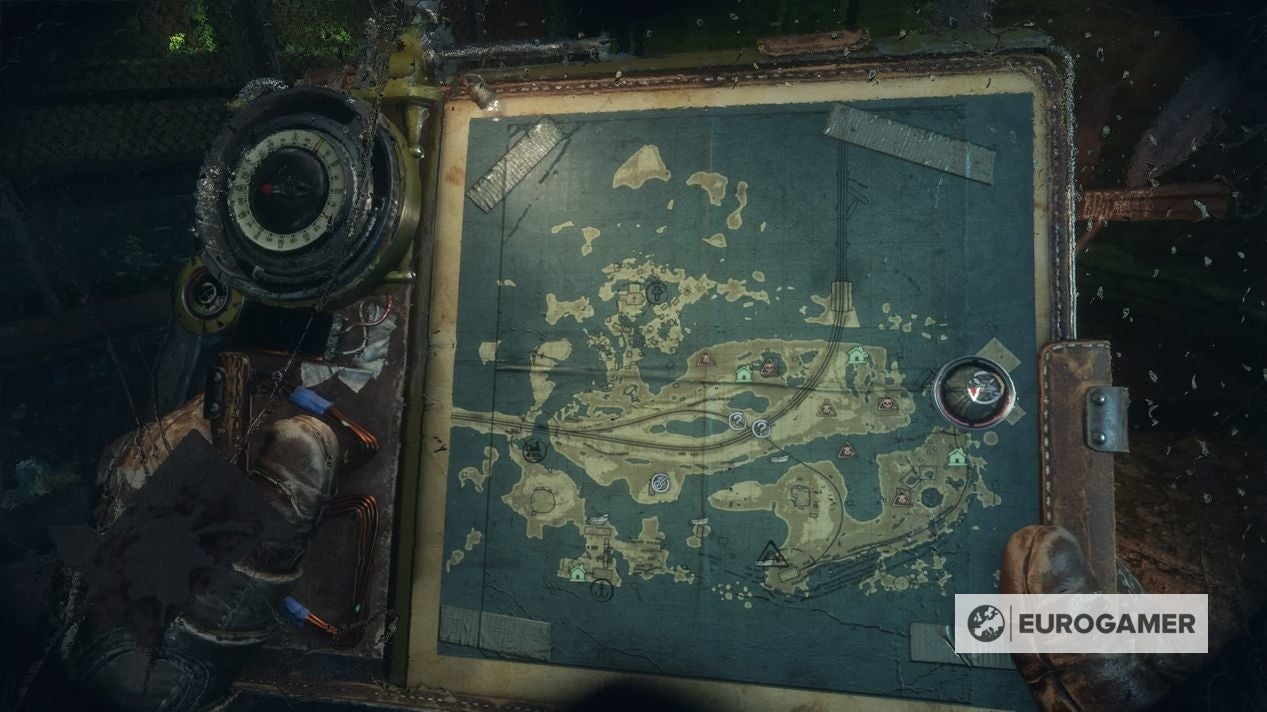
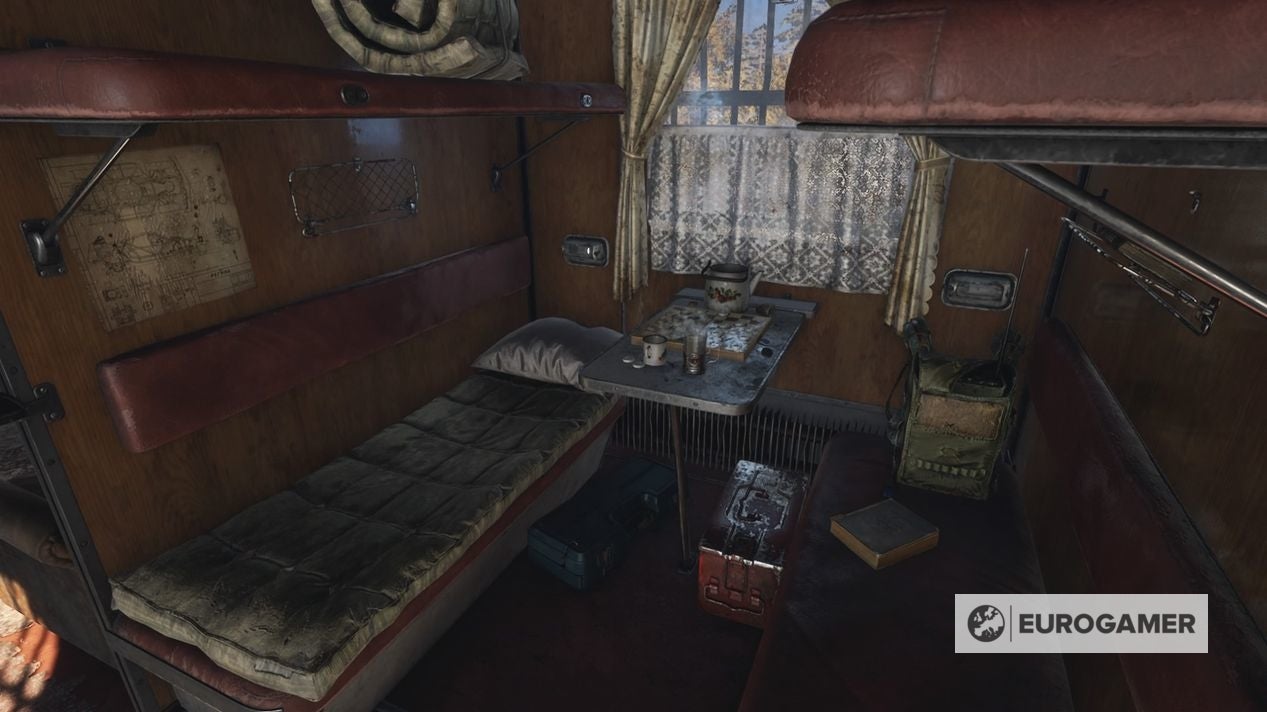
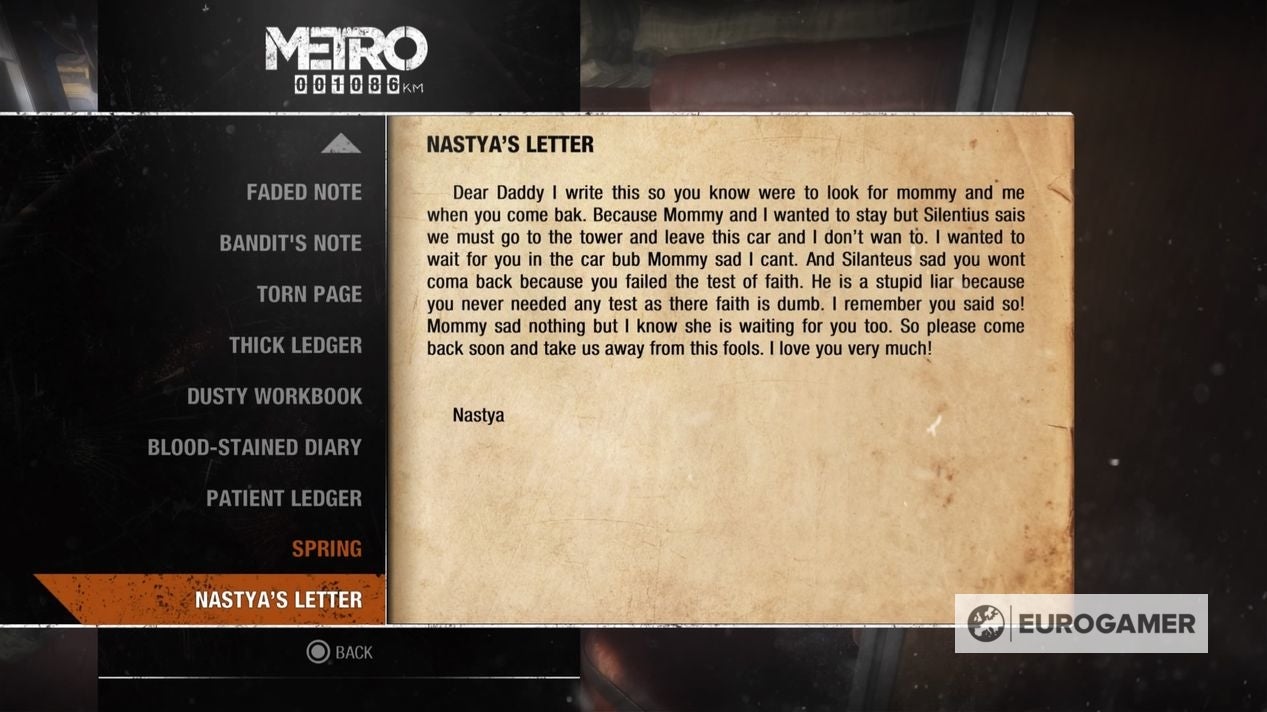
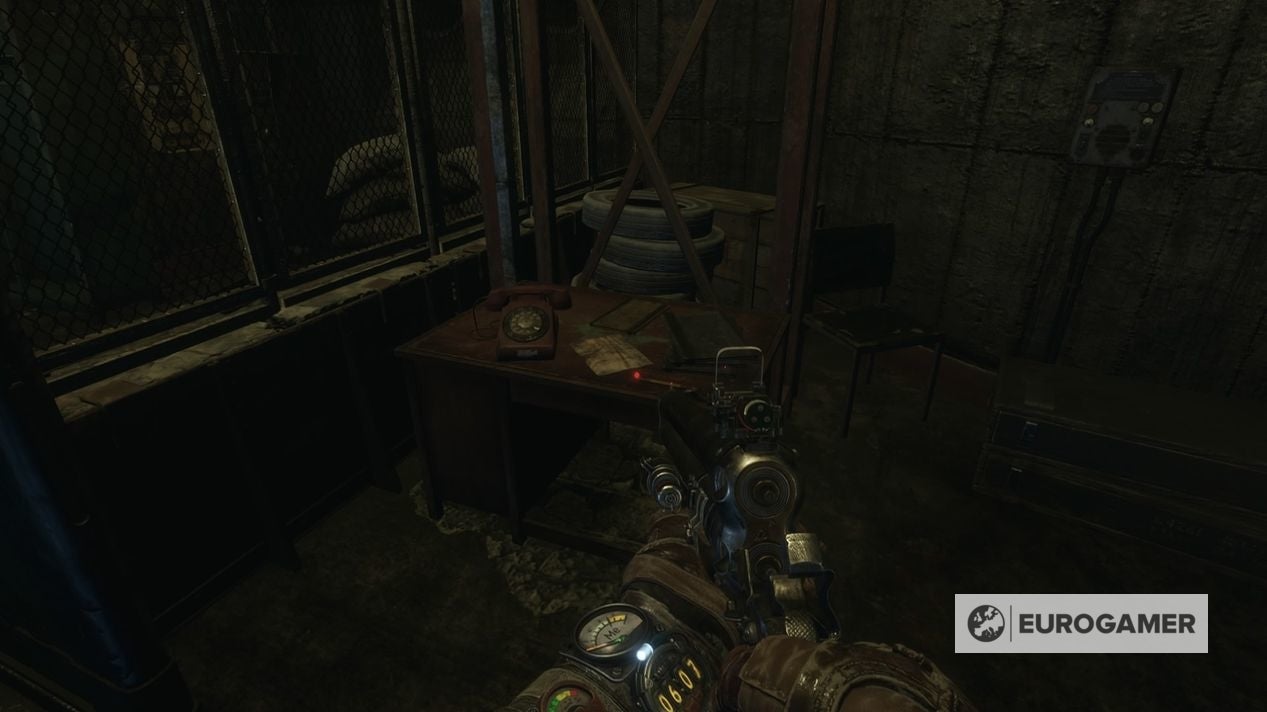
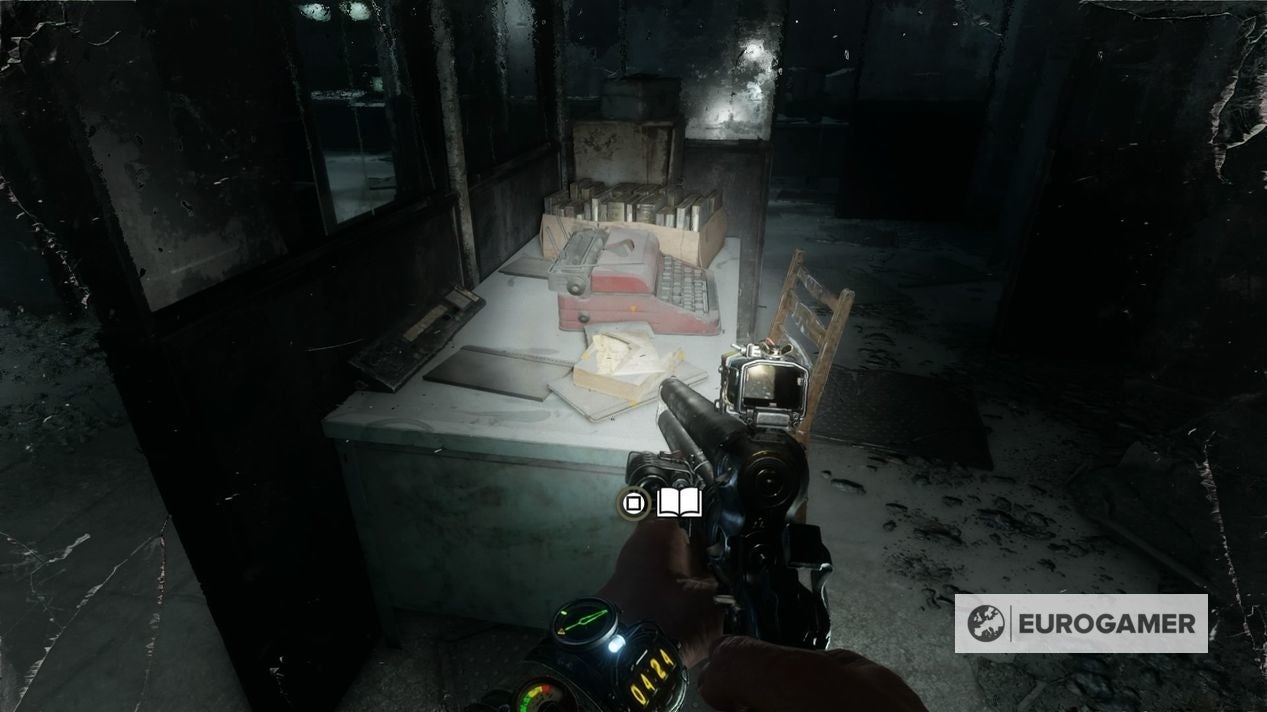
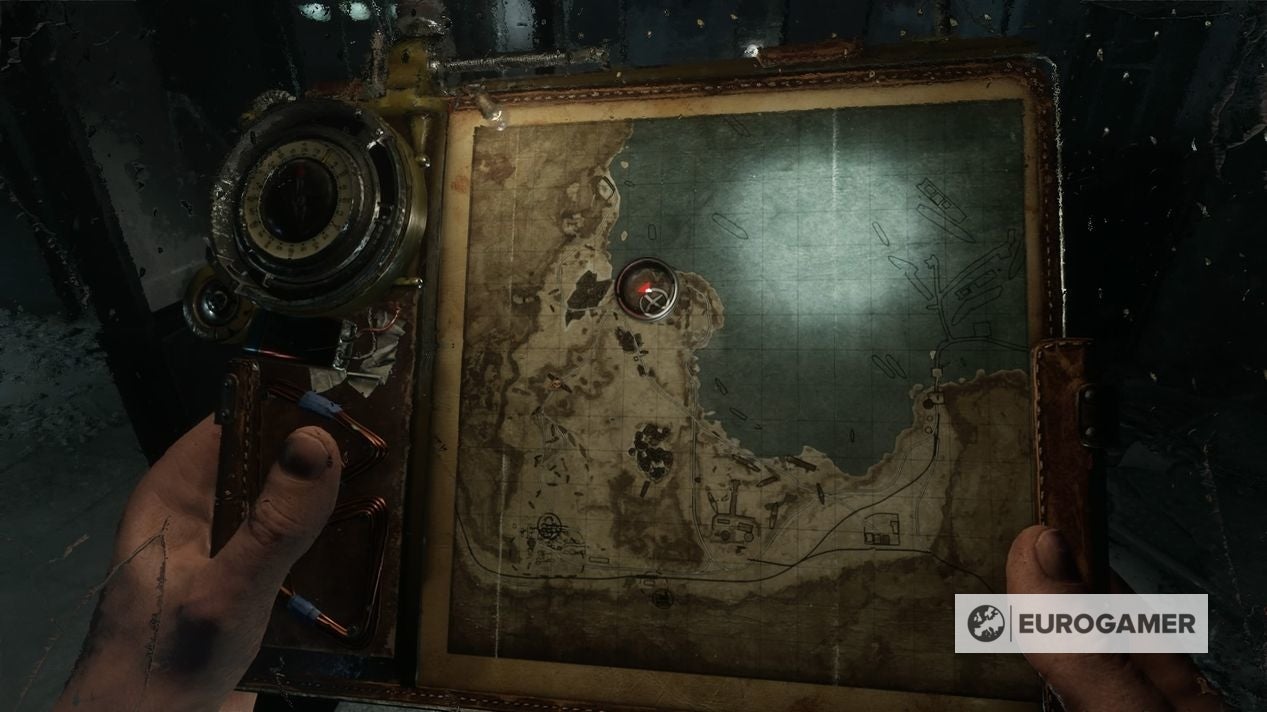
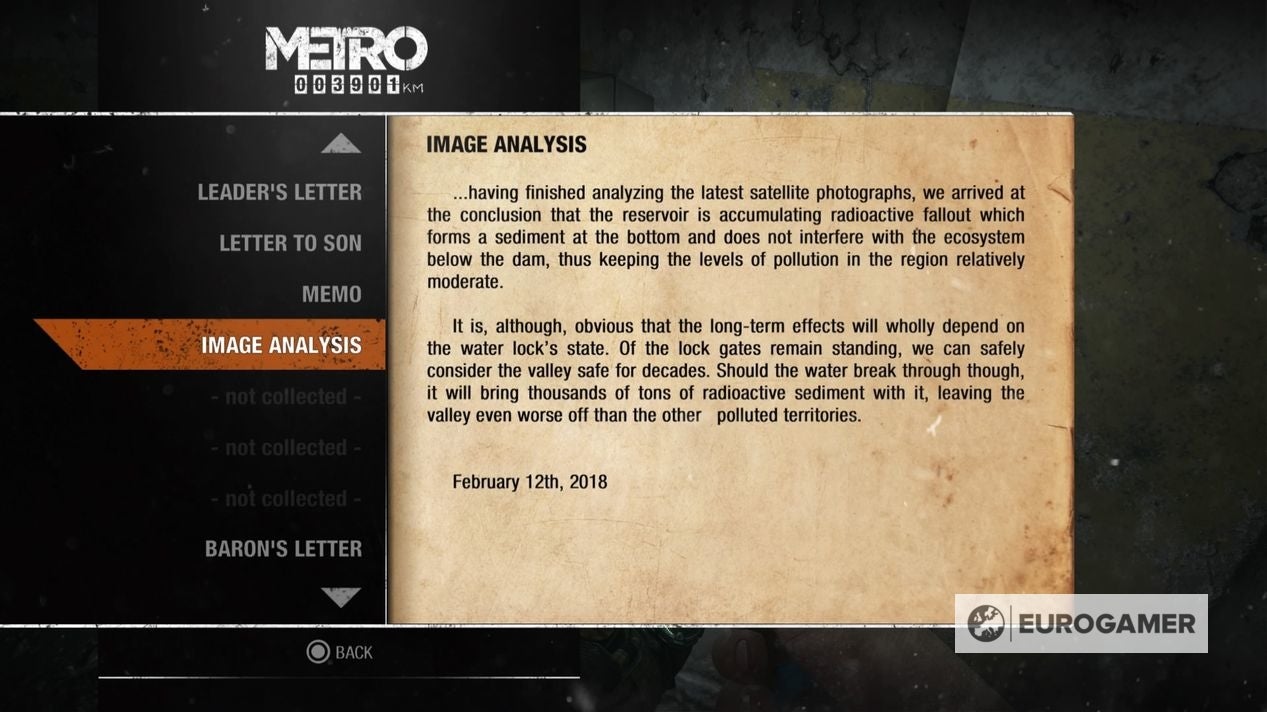
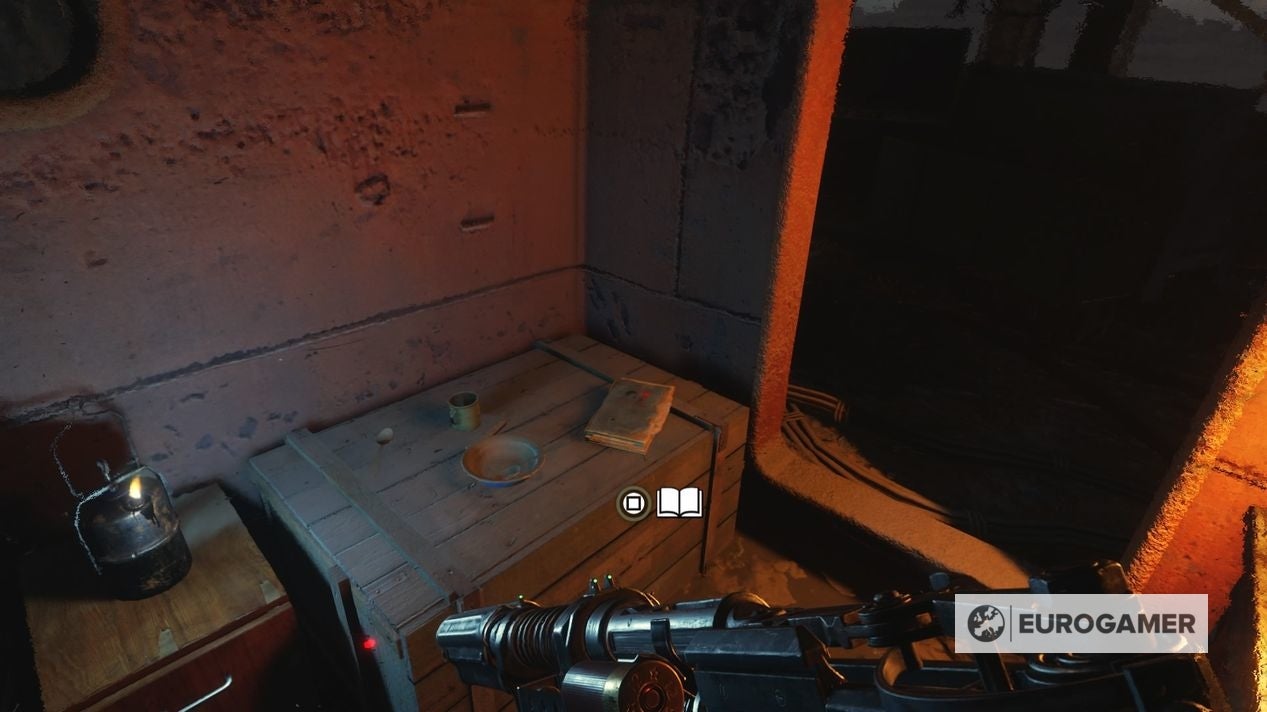
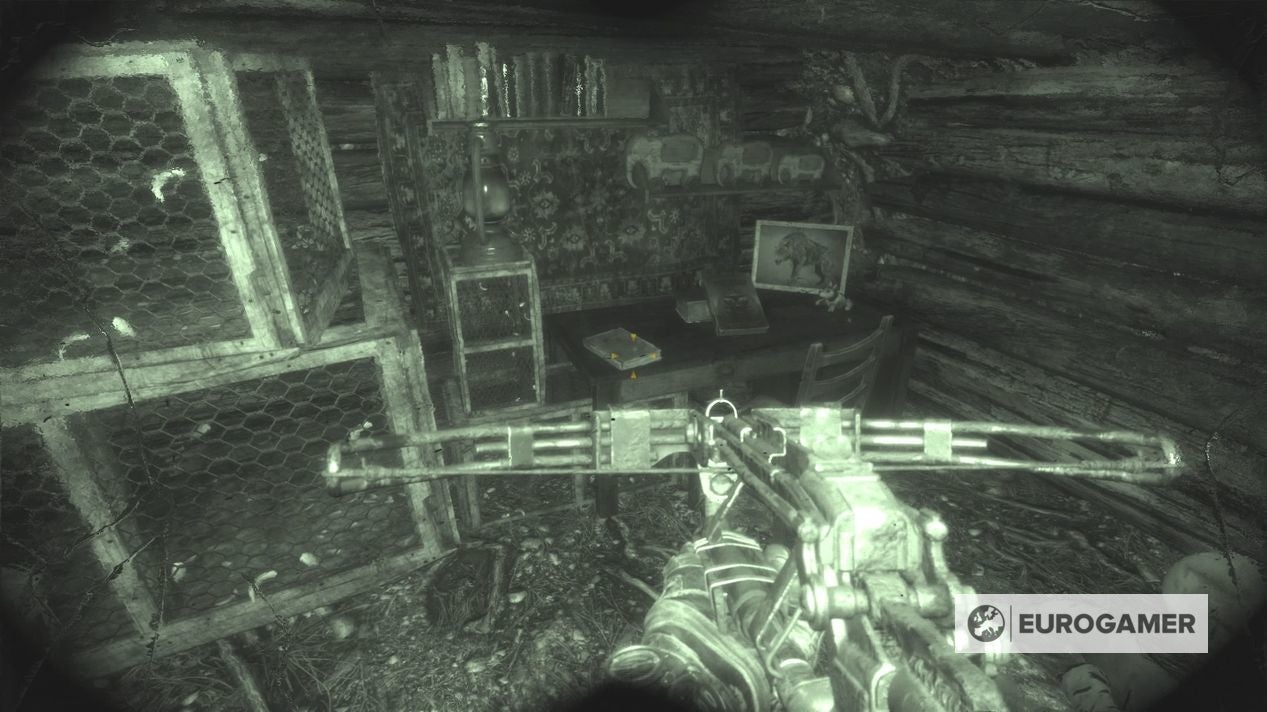
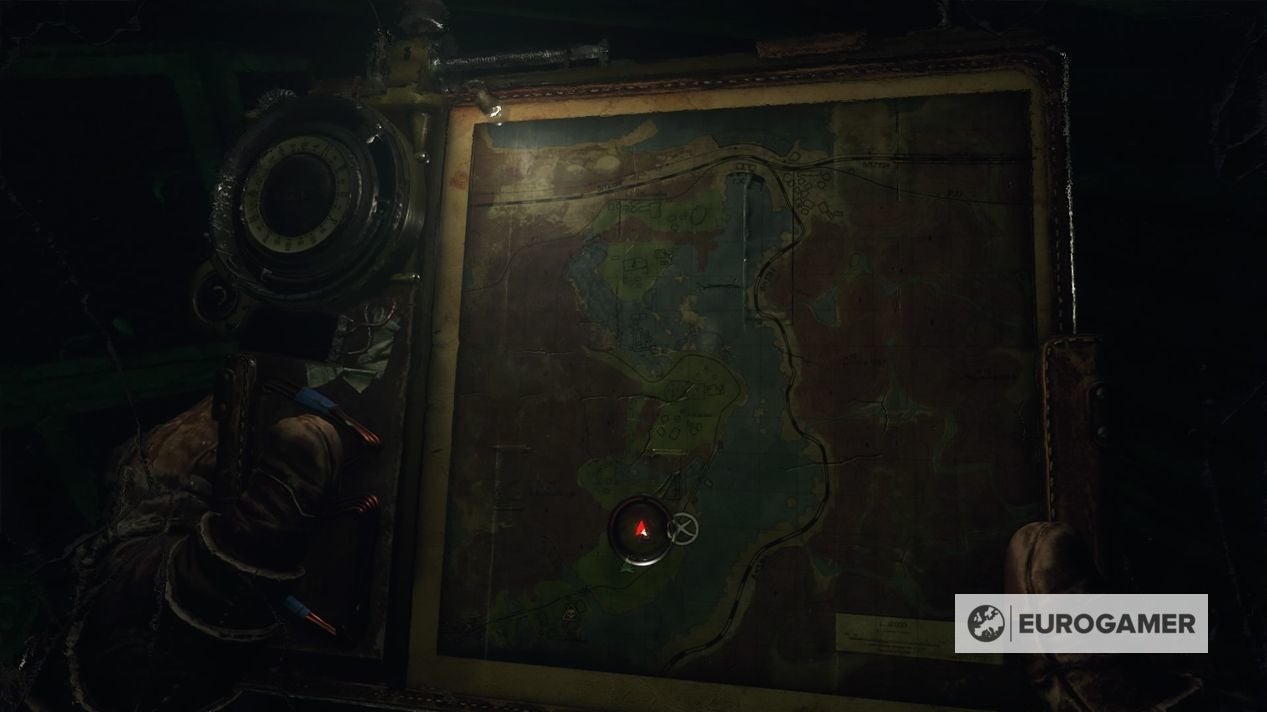
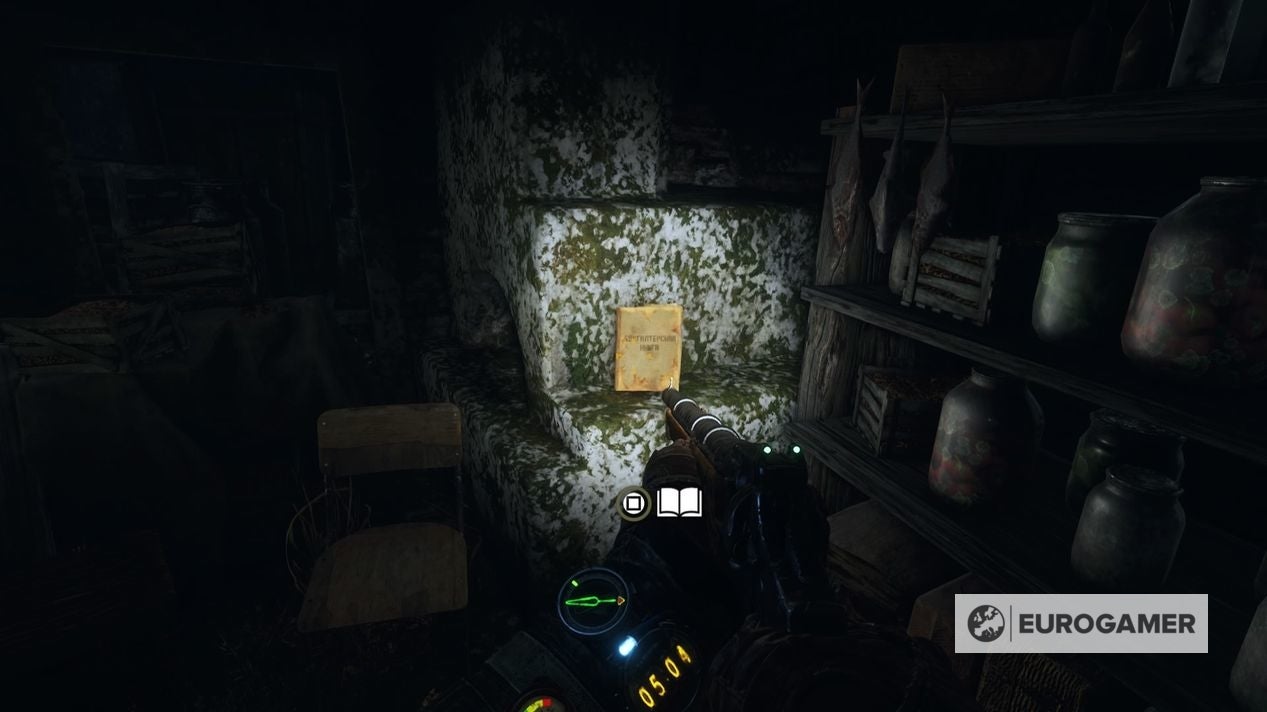
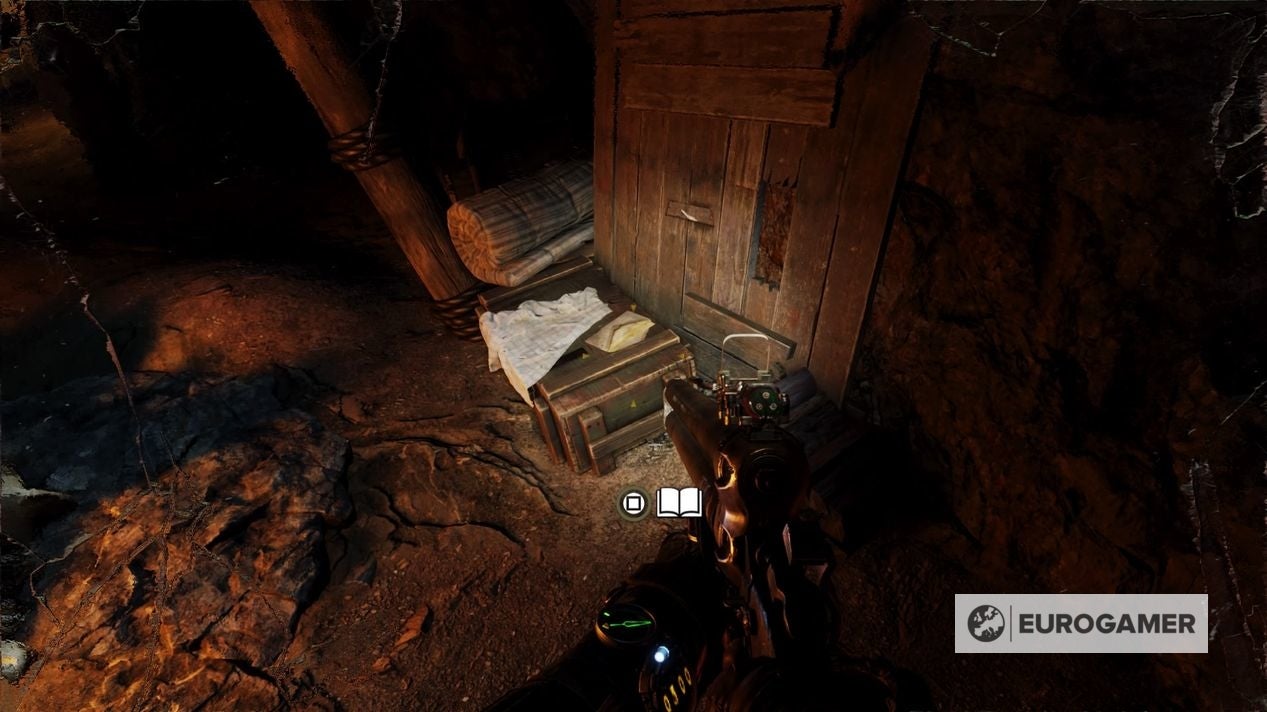
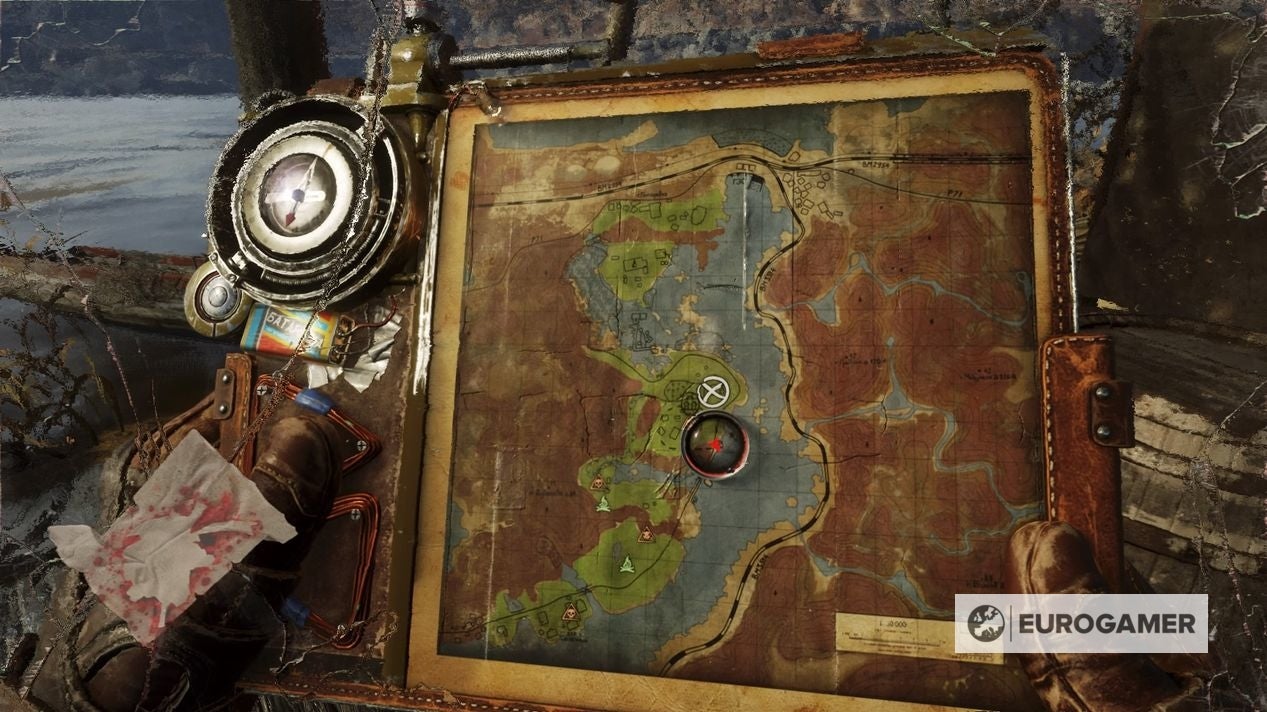
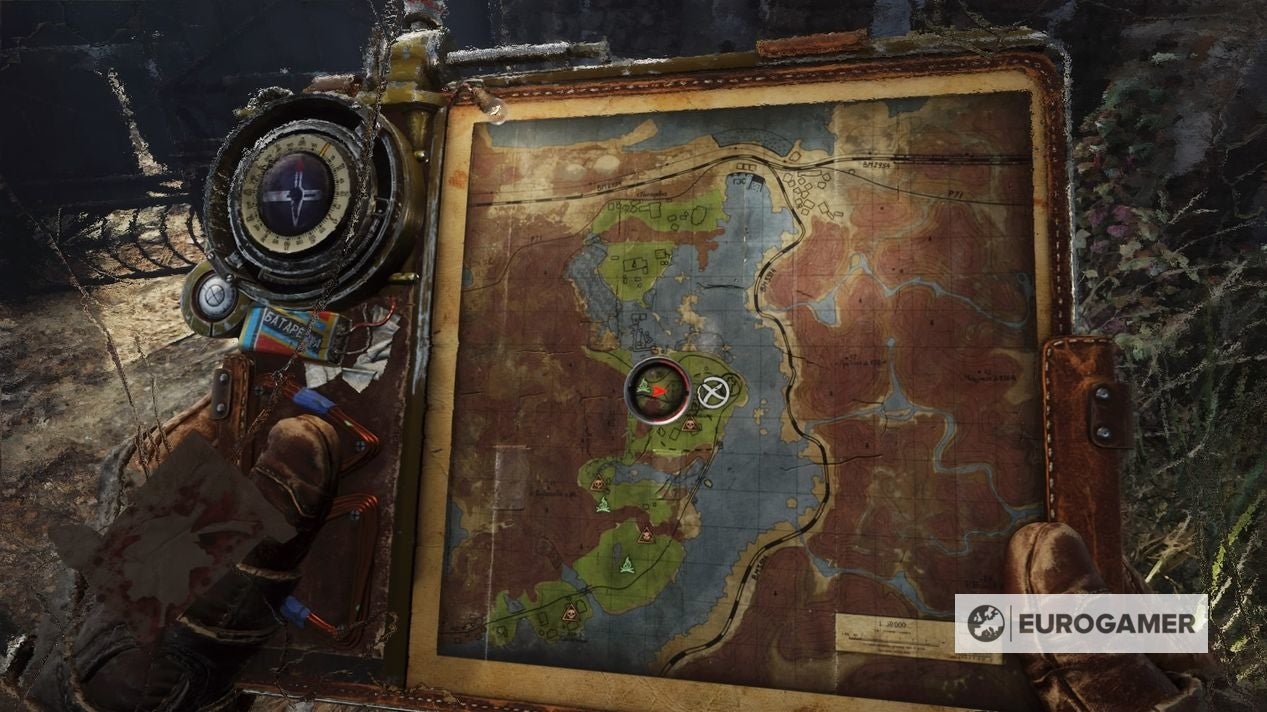
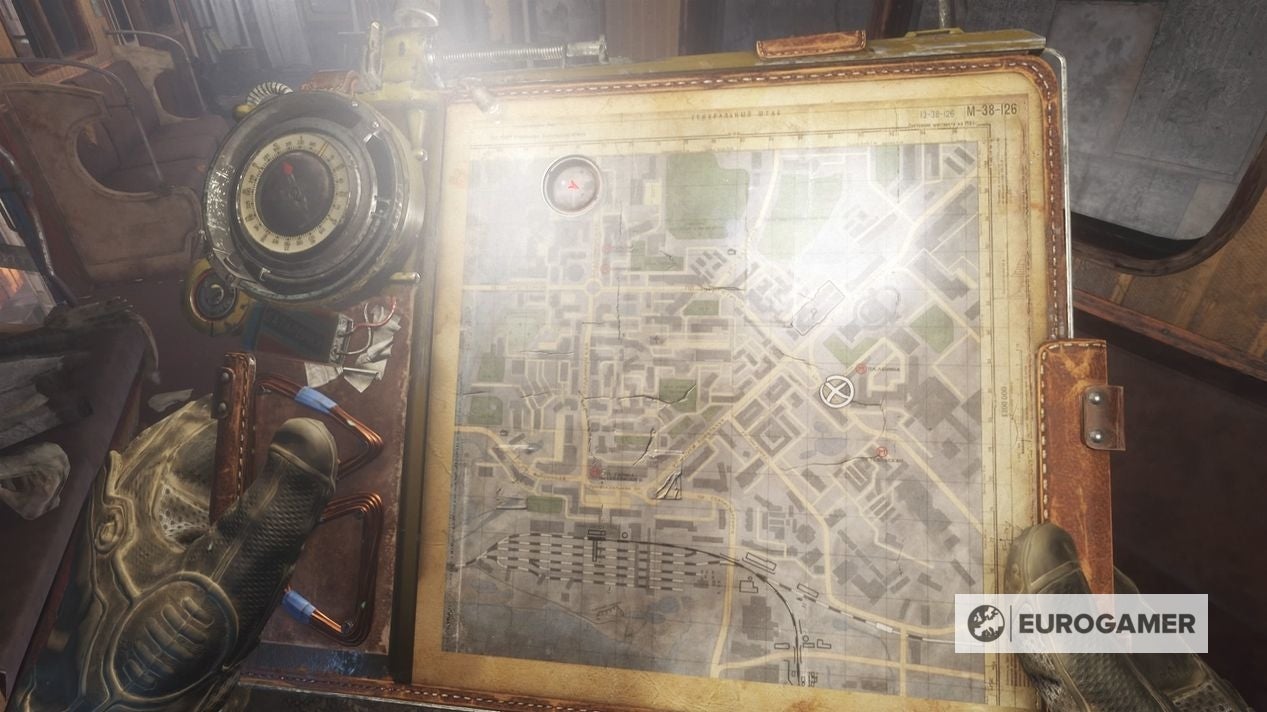
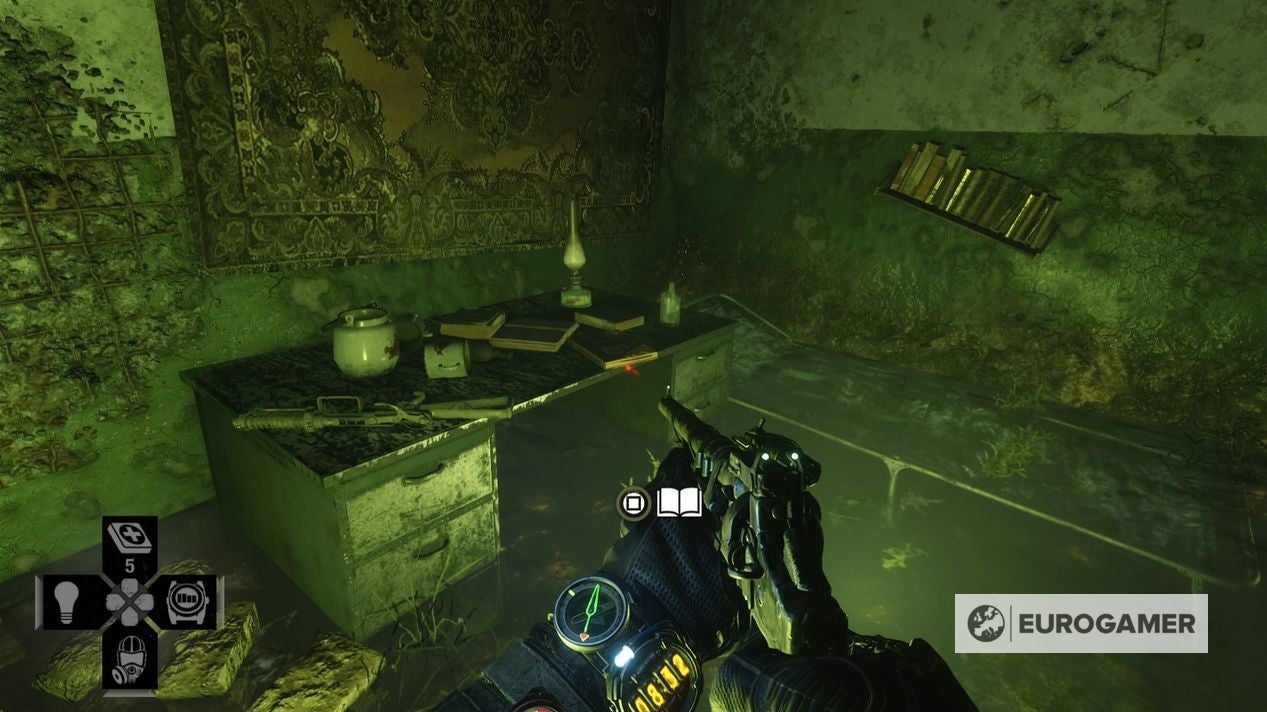
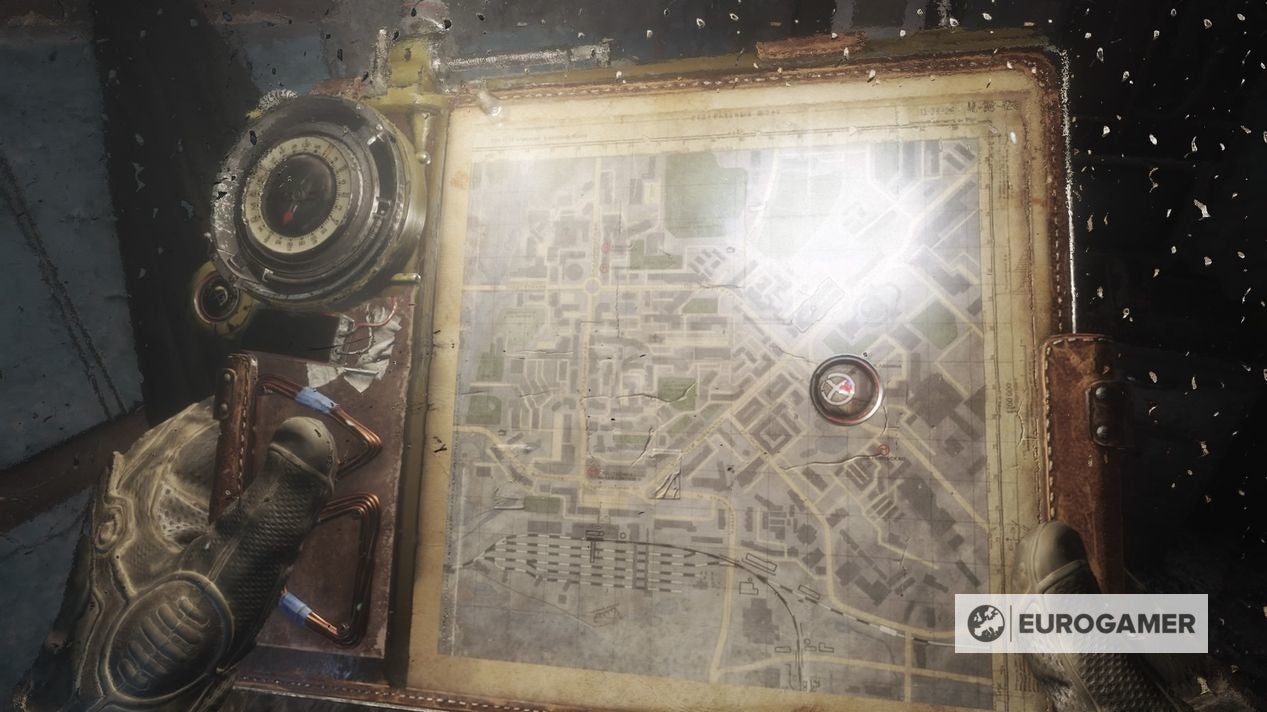
Unfortunately going above and beyond to retrieve them all yields little benefit, serving only as a way to deepen the lore surrounding the game with little anecdotes and insights. On this page: However, collecting them all will trigger a satisfying ‘ping’ as you are ultimately rewarded with the ‘Librarian’ silver trophy. Before our Metro Exodus Diary locations list, here’s some details on how the collectibles work. The trophy list dictates that there’s a grand total of 70 diary pages to collect however, there’s in fact 71 to be found and you’ll require all of them for the trophy to pop. So, for the sake of this guide and ensuring you retrieve them all, we’ll accommodate the latter and show you how to get all 71. You can view the Metro Exodus diary pages you’ve obtained in the pause menu under collectibles where you can also check chapters in which you are missing entries and revisit them in chapter select. This Metro Exodus diary locations page will show the diary pages order in which they appear. The map isn’t accessible at all points during the game so in instances where it’s unavailable, a broader shot has been provided to help distinguish the location of the collectible. Diary 1 (Half-torn Notebook) location The first diary of the game is situated just after your encounter with a Watchman. After you’re attacked turn right and make quick work of the numerous other mutants that ambush you. On a desk in the right corner of this area is a desk on which you’ll find the diary page. Note: We found the collectable before taking these screens: Diary 2 (Patient File) location After waking up in the hospital following the Watchmen ambush in the tunnels and resuming control of Artyom you’ll find the diary page just past a sink on a desk to your right. Diary 3 (Dusty Diary) location One week later you’re outside with Anna in a highrise building. After commencing your descent into the building you’ll proceed down some stairs, after one flight turn right into a corridor and then into an apartment building. In the second room to the left there’s a green sofa and a small table upon which is the diary page. Diary 4 (Shopping List) location Trailing after Anna you’ll eventually cross into another building via an iron beam where you’ll be ambushed by a pack of Watchmen. Kill them and head to the left of the room where a body’s propped up against a door clutching the diary entry. Diary 5 (Shura’s Note) location After the previous entry you’ll exit the the building via some escalators. At the bottom you’ll walk into a blue bus where you’ll find the diary page on a seat to the right as you enter. Diary 6 (Crumpled Letter) location After cutscene you’ll plummet into a ditch and temporarily separate from Anna. After crawling under some logs and retrieving a medikit from a corpse, directly ahead is another corpse embedded into the bank of the ditch with the diary page. Diary 7 (Official Note) location You’ll eventually reunite with Anna and have a tussle with a commander by a console On the top of the console is the Official Note. Note: We found the collectable before taking these screens: Diary 8 (Memo) location You’ll eventually come to a courtyard littered with enemies. After either stealthily negotiating the area or opting for all out warfare, you’ll pass through a red door. The diary page is on a desk to the left in this room. Note: We found the collectable before taking these screens: Diary 9 (Official Letter) location Once the Aurora is in your grasp you’ll go head to head with an enemy train. After boarding and shimmying along its side you’ll take out an unwary enemy in a window. As you climb in through said window, look down to your left for a vent that will take you into the next carriage. Take out the enemies in here and find the diary on the left of where you entered. Diary 10 (Crumpled Note) location Still on the enemy train, pass through the carriage with the mounted LMG onto the next where as soon as you enter you’ll find the diary page on a box to your right. Diary 11 (Survey Report) location Once in control of Artyom again, you’ll find Anna crouched on the floor talking to Alyosha blocking the stairs. After she’s finished talkings, proceed down the stairs to find the diary page on a box directly ahead. Note: We found the collectable before taking these screens: Following the story path will nudge you in the direction of most of the 13 diaries in this area however, a few do require you to be brave and trek further out into the formidable, desolate remains of civilization. Diary 12 (Mouldy Log) location In the first mission of the chapter you’ll row out to a church overrun by religious fanatics. On your journey back after being saved from the water by a fellow spartan you’ll find yourself on a set path back to the Aurora. After passing a plane wreck you’ll encounter a camp most easily identified by the mutant shrimps on pikes (presumably the means to ward of unwelcome strangers that proved ineffective judging by the corpses in the camp itself). At the base of a bedroll is the diary page. Note: We found the collectable before taking these screens: Diary 13 (Faded Note) location The next story mission will send you south towards a crane. You’ll pass through a building upon docking your rowboat in which you’ll have your first encounter with a humanimal (zombie), around the back of this structure is some steps that lead down to a basement. Opening the gate will alert a humanimal which you must kill, once dead proceed to the shelves behind the zombie to grab the collectible. Diary 14 (Waterlogged Note) location After leaving Krest’s crane hideout you’ll head to the next objective in which you’ll fall through a hole in the ground into a cellar where Anna is trapped. Follow the catwalk across the flooded area towards a blue glowing light. Veer right to a locked door, shoot the padlock and proceed through the door and turn right to find the diary page on a box to the left. Diary 15 (Dusty Workbook) location Follow the train tracks to the center point of the map where there is a container by a pylon. Enter via the door and clear the webs to reveal the diary page on a desk to your left. Diary 16 (Folded Letter) location Head east from the prior diary page to a bandit camp that resembles a barn-like structure. On the ground floor in the center area is a table with a white cloth. The diary is by a dead chicken on top of this cloth. Note: We found the collectable before taking these screens: Diary 17 (Torn Page) location Head to the north east part of the map, past the bridge that connects the cultists fort to the mainland. In this area is a lone vehicle in the road with a door on the back. Enter the door and pick up the diary page on the metal racking. Diary 18 (Weathered Notice) location South of the previous diary page is a petrol station occupied by thugs. Clear them out and proceed to the front left room of the station through the window to procure the diary page. Diary 19 (Sturdy Envelope) location A brief stroll west of the petrol station is a lone vehicle by some sandbags. The diary page is inside the vehicle. Be wary as the area is rather open and with demons lurking above there’s a chance you could be snatched up by one. Diary 20 (Bandit’s Note) location South west of the Sturdy Envelope diary is a small island in the middle of the river which is easily identified on the map. A rowboat can be salvaged at a small dock to the east of this location. The diary entry is on a wooden plank in the center of the island. Diary 21 (Patient’s Ledger) location In a cove to the south of the map is another island which you will need a boat from a nearby dock to reach due to obstructions in the water. Enter the cabin on the island and proceed through from room to room until you find the Patient’s Ledger on a desk in a room with a body suspended from the ceiling by a noose. Diary 22 (Blood-stained Diary) location In the southeast corner of the map is a shack on a small cluster of islands. Break into the shack by destroying the lock on the door to find the diary page on a bookcase in front of you as you enter. Diary 23 (Faded Note) location This is the second Faded Note in this chapter. Just northeast of the prior diary page is a crumbling structure. Make your way up via the orange containers and follow the toppled pillars to your right across a plank where you’ll approach a yellow ladder. In this lookout tower you’ll find the diary page. Diary 24 (Thick Ledger) location When you journey out to deal with the Tsar-fish in its lair in the far east of the map, you’ll eventually come to a room with a bell that’s situated by the main entrance. On a little chair to the left of this room is the diary page. Diary 25 (Natysha’s Letter) location Exit your cabin after a cutscene in which Anna wakes you. Turn right to the boot there to find the diary page on the table. Note: We found the collectable before taking these screens: Diary 26 (Diary Page 1) location After the opening sequence including a heated combat encounter with hordes of cannibals you’ll separate from Miller at the top of a lift. Walk through the security checkpoint where you dismount and look to your left to find the diary page on the left. Note: We found the collectable before taking these screens: Diary 27 (Diary Page 2) location A few rooms on and you’ll proceed into a icy room resembling a morgue. Continue your way through the morgue until you squeeze through into another area with a powerbox. On the left of the powerbox is a crawlspace, on the other side of this is a container on the left-hand side of the room with the diary page on top. Diary 28 (Diary Page 3) location Continue battling against the onslaught of cannibals until you reach a flooded area. After walking past some blinking red lights you’ll encounter a fork in the road with a yellow pipe on the left and boxes to your right. Climb over the boxes and keep to the wall on the right to enter a little room where you’ll find the diary page to the left of the room on a box. Note: We found the collectable before taking these screens: Diary 29 (Officer’s Diary 1) location Soon enough you’ll encounter a sort of boss fight against an enemy with a minigun. Once he’s taken care of, you’ll make your way into a room containing 6 cells. The diary page is in a the middle cell to your right next to an axe on a surgical table on the left-hand side of the room from where you enter. Note: We found the collectable before taking these screens: Diary 30 (Officer’s Diary 2) location Following the cutscene where you rescue Anna from the cannibalistic doctor you’ll follow her through some doors towards a lift. Continue to the entrance of the lift where on the left-hand side on a barrel is the diary page. Note: We found the collectable before taking these screens: Diary 31 (Officer’s Diary 3) location At some point you’ll regroup with the rest of the Spartans and proceed towards a lift to make your exit. Keep an eye on your left as you make your escape for a box with books and the diary page on. This point is easily identified by the ‘A4’ symbol that you’ll find yourself walking towards. Note: We found the collectable before taking these screens: Diary 32 (First Mate’s Diary) location Follow the main track northwest to a giant ship/ fortress that overhangs the main road with enslaved people at work outside. Enter right beneath the canopy and climb some stairs on your right on a desk is the diary entry. Diary 33 (Leader’s Letter) location Same location as before. Continue forward from the last diary entry to a ladder which once at the top will see you emerge onto the deck of the ship. Follow the clear path through the containers to the next room and follow the stairs on the left. In the back right corner past a ladder is a desk with a radio and the diary page. Diary 34 (Baron’s Letter) location Northwest past some bubbling pits is a truck with a cage attached to it parked by an umbrella with a table in it’s shadow. On said table you’ll find the diary page. Diary 35 (Death Note) location Stroll into the camp entrance just left of the last diary page. Clear out the enemies occupying the area to gain access to a rope ladder at the very back of the camp that drops when the last enemy falls. Up the ladder on top of a barrel is the diary page. Diary 36 (Letter To Son) location The story path will chart a course to a lighthouse east of the prior diary page. Enter the lighthouse via a zipline that will take you somewhat underground. Follow the bridges until you stumble across a corpse holding a blue glow stick. On his left is the diary page. Diary 37 (Memo) location From the lighthouse where you meet Giul, the story will take you to an underground bunker. After descending into the harrowing depths of the bunker via a lift you’ll come to a door that requires power to open. Between the door and the switch, take a path left and then turn right into a little office where the diary page can be found on a desk with a typewriter just as you enter. Diary 38 (Image Analysis) location After enduring more hellish antics in the bunker you’ll be told to enter the map room through a ventilation shaft by which point you should have approached a locked door with a crawlspace to it’s right. Crouch and enter here and continue to the back right corner of the room where there’s a desk with the Image Analysis diary page on top. Diary 39 (Last Orders) location Once you’ve made your way through the ventilation system you’ll exit into the map room. Go through the door beneath where you drop down into a conference room. The diary is by the corpse sat at the head of the big table. Diary 40 (Diary Fragments) location In more or less the center point of the map is a ship surrounded by bubbling pits like the ones mentioned beforehand. Negotiate your way to the ship, enter and make your way upwards until you meet a hermit. Across from his desk the diary entry is sat upon a wooden crate. Diary 41 (Letter To The Artist) location At some point in this chapter, the story will have you travel to the most northwest point of the map where you’ll find the oasis. After entering with Damir via the slope, keep left to find a ramp that’ll take you up and round. At the top on a radio is the diary page. Diary 42 (Shopping List) location Head northeast from the Aurora where you’ll come across another boat. Enter, making short work of the thugs loitering inside and proceed to the upper levels of the boat to find the control room. Here you’ll find the diary entry on a terminal. Diary 43 (Charred Note) location Just south of the prior diary page is a bridge like structure overhanging an intersection populated with thugs. Climb up to a lookout platform where on top of a pile of crates you’ll find the diary entry. Diary 44 (Tokarev’s Note) location After a cutscene with Anna make haste out of your cabin and turn right to the back of the train. Continue in this direction until you come to the train car with a vehicle in it. The diary page is on the right-hand side on a desk. Nevertheless, a whopping 18 diary pages are scattered throughout this chapter. Diary 45 (Note On Crossbow Bolt) location Once you’ve reclaimed control over Artyom you’ll proceed up a set of wooden stairs and pick up a crossbow off of a statue. Continue straight through the gate. Turn around as you exit to find the diary page attached to a crossbow bolt on the outside of the gate. It’s worth noting the collectible appears randomly on the gate. Should you be unable to locate it, simply reload the most recent checkpoint until it appears. Diary 46 (Unsent Letter) location From the gate you’ve just exited from, follow the signs right that lead you to the children’s camp. Make your way up the stairs past the statue and enter the first building on your right where you’ll find the diary page on a desk. Diary 47 (Little Kids Note) location Cross the bridge at the end of the children’s camp where you’ll be taunted by pirates. Turn into the first green house on the right after the bridge and turn into the room on the right-hand side. Beside a teddy on a desk is the diary page. Diary 48 (Solemn Oath) location In this same area you’ll need to climb to the top of the tower via the spiral staircase in order to zipline across the river and progress with the story. Before you attach yourself to the zipline and proceed pick up the diary page on the crate at the very top. Diary 49 (Dusty Diary) location After ziplining from the tower, continue along the immediate path until you see a treehouse on your left. Use the ladder to ascend and you’ll find the diary page to the right of the fire on top of a crate. Diary 50 (Alchemist’s Log) location Exit the tree house to the left and walk across a small bridge and use the zipline. You’ll arrive near a small camp with a single enemy lurking nearby. Execute the enemy to take the diary page that lay inside the cabin on his bed. Diary 51 (Lost Diary) location On the other side of the road running through the map, opposite the treehouse is a lone cabin by the waterfront. The diary is inside on a wooden crate by a bucket. Diary 52 (Dusty Notebook) location Continuing to the objective will eventually lead you to a ladder that will allow you to scale up some rocks. To the left of this ladder is a cave which can be identified by a green glow. Enter the cave and at the very back you’ll locate the diary page. Diary 53 (Calligraphic Note) location Climb the aforementioned ladder to the right of the cave to proceed into an outpost with lookout towers dotted throughout. After a cutscene, continue onwards keeping to the left where you’ll eventually come across a house by itself. Enter to find the diary page on a table on the left-hand side. Diary 54 (Scribbled Note) location Pressing on from the last entry you may use one of two entrances to enter the camp fully. In the very center area by a fire a house will be on the right-hand side where the diary page can be found inside on a dining table with posters above it. Diary 55 (Worn Out Letter) location Continue chasing the story markers on the map until you eventually zipline down into a canyon. After dismounting, carry on walking onwards until you encounter a tunnel entrance on your right. Crouch and enter to find the diary page on a box to the right of the fire. Diary 56 (Crumpled Note) location Proceed down the same tunnel until you come across a corpse (shortly after a body falls in from above) holding the diary page. Diary 57 (Dirty Diary) location You’ll emerge from the dark confines of the tunnel into a cluster of houses overrun with vegetation. Take the path down to the waterfront and follow it along to the right where you’ll eventually come across a body with an axe in it’s back slumped over a table. The diary page is on said table. Diary 58 (Hunter’s Note) location The story will guide you northwest towards a church. Led against the gate is a body with the diary page just to the right of it. Diary 59 (Weathered Note) location After some serious action ensues at the church you’ll be directed west. Along the path you are ushered down is a gazebo with a zipline hooked up to it. Enter and look down to your left to procure the diary page. Diary 60 (Folded Note) location Upon reaching the swamp camp, make your way to the very back where you interact with a lever to allow your subsequential escape with a rowboat. On the first floor of the same building is a diary page on a table to your right as you enter. Diary 61 (Blood Soaked Letter) location After reaching the Admiral’s home in the marshes you’ll zipline across to another underground section choc-full of mutant creepy crawlies to contend with. Get to the point at which you’ve turned on the generator and opened the door, proceed through to find a corpse on the floor holding the diary page. Diary 62 (Unfinished Letter) location After exiting the underground section of this chapter and meeting up with Alyosha you’ll follow a path down into a street of houses. Be sure not to go frolicing off in a hurry as rushing to the end of the street will result in you completing the chapter without the final diary page. Turn into the middle house on the right, it’s entrance just before you reach a green truck. The diary page can be found on a table as you enter the house. Diary 63 (Katya’s Note) location Proceed to the front of the train and talk to Miller. Instead of exiting the chapter, backtrack to where the workbench is typically found and opposite that is the diary page. Diary 64 (Radiogram Transcript) location After a section where you wade through water with Miller you’ll enter a room corpses and hanging cages. Go up the slope and keep right to find the diary page on a desk. Diary 65 (Weathered Report) location A little later on after an enemy ambush you’ll make your way up an escalator. Turn left to a door, open it and follow a string of rooms to a third room. Tucked away to the left on a desk is the diary page. Diary 66 (Orders) location As you progress with the story you’ll encounter a new character. In Kiril’s hideout is a board with an assortment of maps on it. Nestled amongst them is a diary page. Diary 67 (Notebook) location Shortly after departing Kirils hideout you’ll come to an underground shantytown of sorts. Follow the natural path around the shacks until you reach a train car. The diary page is on a seat by a corpse on your left. Diary 68 (Worn Out Diary) location Following the shantytown you’ll come to a rowboat to comment a rowing section. Shortly after setting off you’ll encounter a room on your left which you must enter. Follow the chain of rooms around and squeeze through the gate that’s ajar. Walk up a small ramp into another room where on the left is the diary page on a desk. Diary 69 (Browned Note) location Once you’re done with the intense rowing section you’ll traverse another set of broken escalators. When you reach the top, keep right and proceed down the corridor where you’ll find a small office on the left with a diary page sat on top of a T.V. Diary 70 (Dusty Notebook) location Artyom will have a vision about a tank and following this you’ll drop down into a hole in the ground. Instead of continuing after the mutant on your right, turn left and circle back round to a dead end where the diary page is hiding. Diary 71 (Shopping List) location After enduring another vision of Anna, you’ll have to descend into another building. Keep right after entering to find some stairs. At the bottom is a blue door, open it to reveal the last diary page directly opposite you on a surgical table. All done? Make sure you pick up any remaining Metro Exodus postcard locations you’ve missed!